iPhotography has been training new photographers for years and over that time we’ve seen over 100,000 course members graduate and take amazing photos.
This photography for beginner’s guide gives us a chance to look back over these years and answer the 12 most common questions new photographers have.
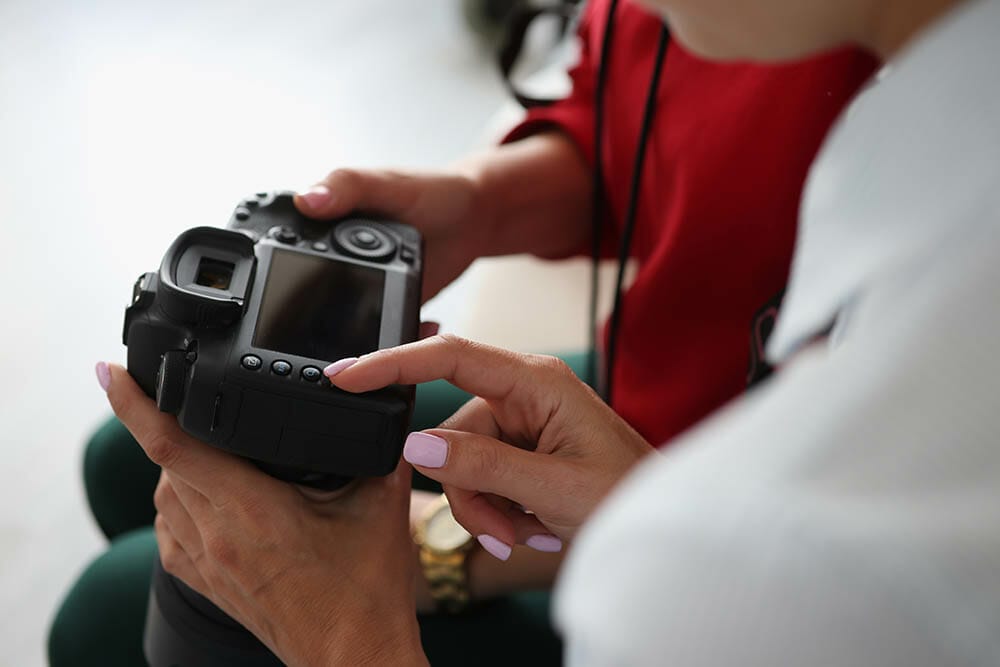
Without getting too complicated and technical, let’s explain how a digital camera works. When light shines on an object it reflects in other directions. Light bouncing off these objects can pass through the glass of a lens and hits the sensor at the back of a digital camera.
There are numerous pieces of glass inside a camera lens to incrementally focus all the incoming lightwaves to a single point – the sensor.
The sensor records these light waves and interprets them into a digital signal converting them to what we see as a photograph.
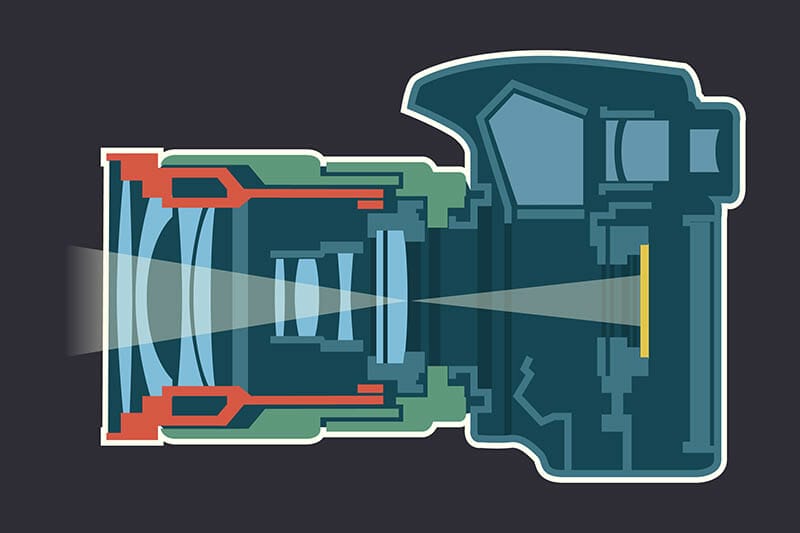
The two most popular types of digital cameras are DSLR (Digital Single Lens Reflex) and Mirrorless.
The main difference between the two is that a mirrorless camera has no built-in reflex mirror. This mirror reflects some of the light coming into the lens that allows the photographer to look through a viewfinder to see what the lens is seeing.
This doesn’t mean mirrorless cameras don’t have viewfinders. Instead mirrorless cameras use an electronic viewfinder to display the image. Because of the lack of a reflex mirror it means the camera can be small in size along with other differences.
Listen to our podcast about common differences between DSLR and Mirrorless cameras.
There are 3 main components to consider when taking a photo – aperture, shutter speed and ISO.
Each of them benefits a different area of photography but all need to be considered when taking a photo on a DSLR or Mirrorless camera to make sure you get the best looking photo. Let’s look at what each one controls;
The aperture is the hole inside the lens that regulates how much light hits the sensor. You can make this hole bigger and smaller by changing the camera’s F/stop. Bigger aperture lets in more light resulting in a brighter image. A smaller aperture lets in less light making your photo darker.
Changing the aperture of your lens is measured on a scale known as F/stops. Small F/stop numbers i.e F/1.4 represents a large aperture size. Whereas at the other end of a scale F/22 means less light will be able to pass through the aperture.
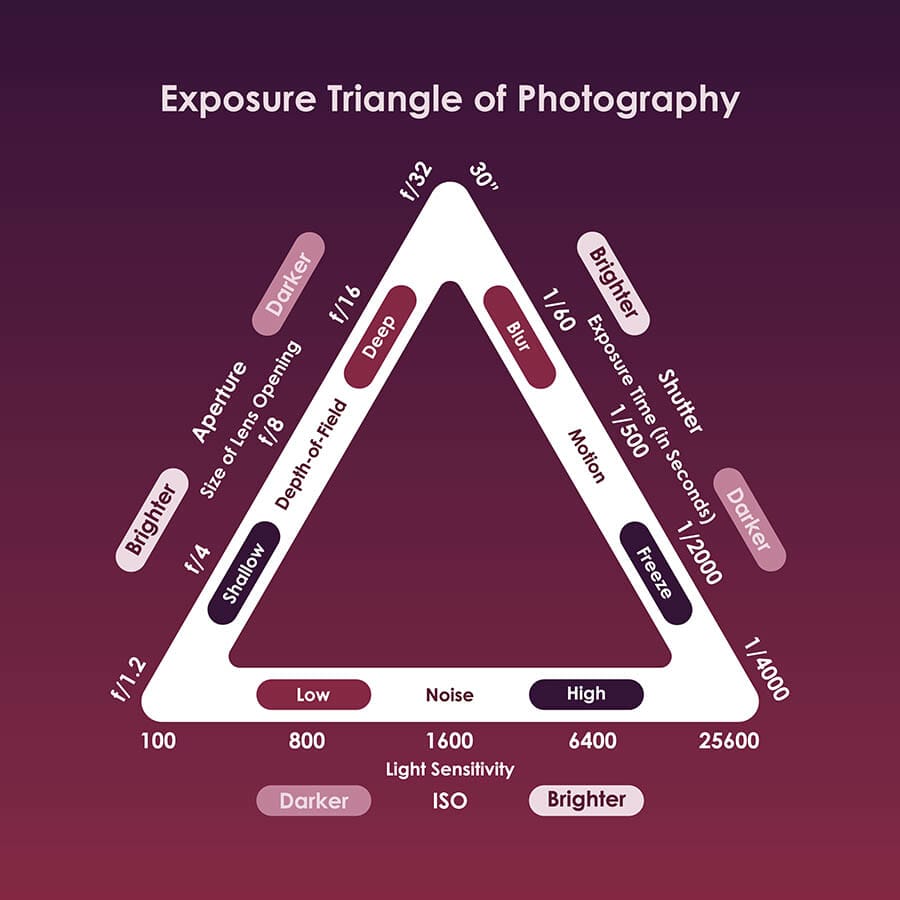
Shutter speed is all about time – how long your camera’s sensor is exposed to light. In front of your sensor is a little ‘door’ that opens and closes when you take the photo. How long that ‘door’ is open for depends on the shutter speed.
The longer the shutter is open the more light can hit the sensor, resulting in a brighter photo. To make a photo darker use a faster shutter speed so the door isn’t open as long.
The length of time the shutter door is open can vary from 30 seconds ( a long/slow shutter speed) through to 1/8000th (fast/short shutter speed).
Slow shutter speeds will not only record more light but also any motion that happens in the scene while the door is open. This is when you can make the movement look blurry as the light waves move during the shot. This can be used creatively on rushing waterfalls as well as shooting at night when there is less natural light.
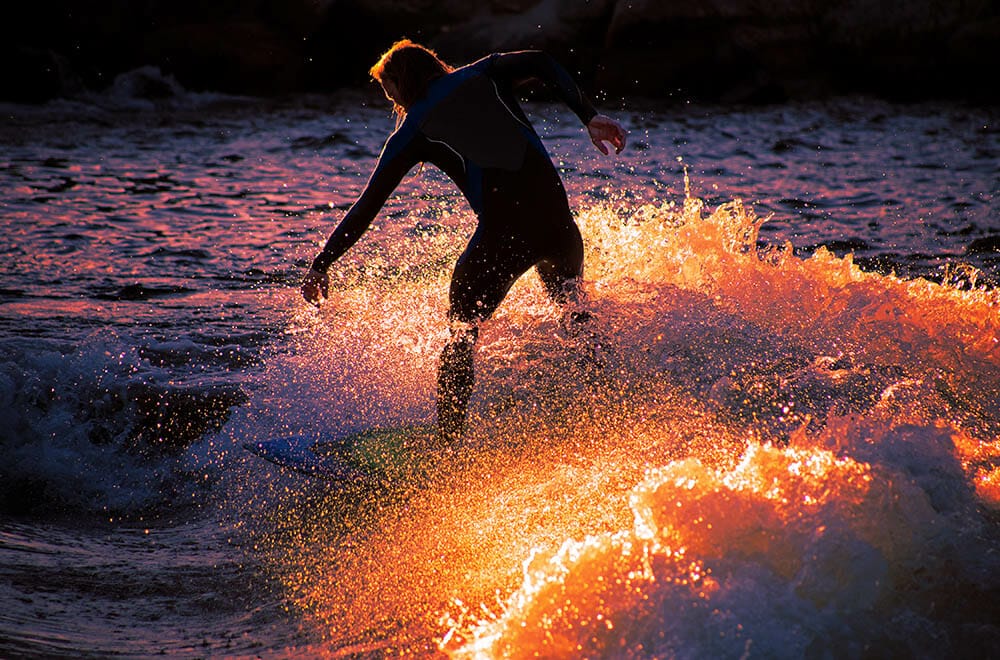
Faster shutter speeds are designed to capture quick motion and make it look sharp. Cars, athletes, wildlife and birds are photographed regularly using a fast shutter speed to freeze the appearance of motion.
If you’re just out and about taking every day snaps you’ll want to use a shutter speed between 1/125th – 1/250th.
When shutter speeds become quicker than 1 second they are expressed as a fraction of that second i.e 1/30th of a second or 1/4th (one-quarter of a second).
Shutter speeds slower than 1/60th may require you to use a tripod to steady the shot as our hands can shake a little while taking photos.
ISO used to be called film speed back in the days of 35mm, but even though the film itself is gone we can still control the sensitivity of its replacement – the digital sensor.
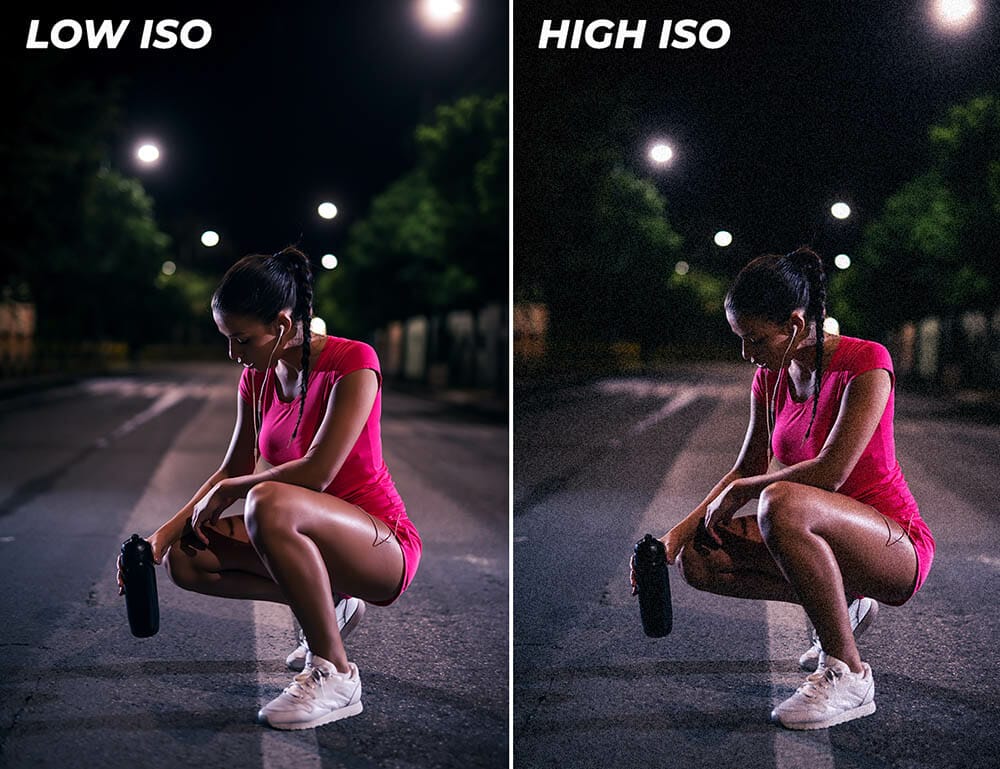
We can increase the sensitivity of the sensor so that it detects more light hitting the surface. This is great if you’re in a dark room and you need your photo to be brighter. By increasing the ISO level it will make your photo brighter – but this doesn’t come without problems.
While technology makes cameras better over time high ISO settings will display digital noise (formerly called grain in the film days). This digital noise is a representation of the pixels on the sensor being pushed beyond their natural levels of sensitivity. High ISO images can look low quality, pixelated, reduced colour retention and generally messy.
It’s best to avoid using high ISO levels unless it’s absolutely necessary. You can brighten a photo by using wider apertures and slower shutter speeds instead. But if they are maxed out and it’s still too dark, bump up your ISO to help.
ISO levels start down at 50 and can go over 250,000 on high end cameras. Typically you’ll want to keep it as low as possible (50-400) for every day shooting.
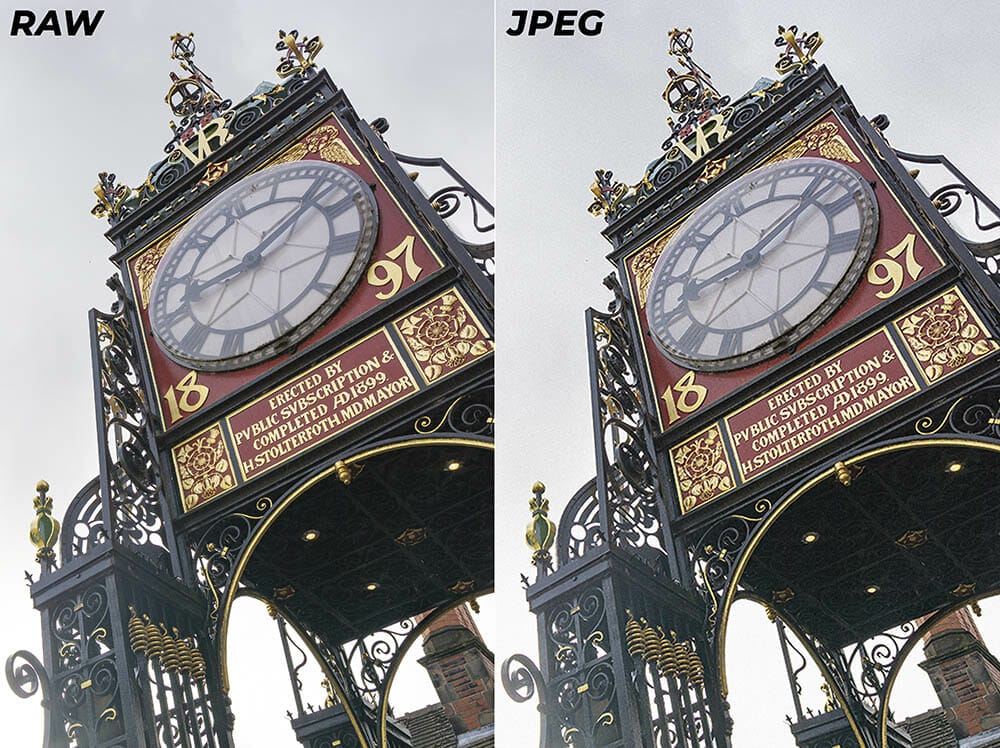
When you’re taking photos on a DSLR or Mirrorless camera you will be offered two formats in which the camera can record the image – JPEG or RAW.
JPEG file formats are what you may be used to seeing or using in everyday life with photos. They are smaller in terms of overall file size compared to similar RAW shots, but that’s because they contain less information.
Think of JPEGs as being the lite version of a RAW – they come with less information meaning there is less latitude when editing them. You can apply in-camera effects/filters directly to a JPEG so what you see on the back of the camera is exactly what you’ll see on your computer. Beginners should definitely consider shooting in RAW.
You don’t shoot differently when capturing in RAW file format. RAW files give much more scope to brighten, darken, sharpen and saturate aspects of your photo in editing.
That doesn’t mean you should forget all about the right camera settings though. The right camera settings will create better RAW files, meaning better images. RAW files will not record the best image if your settings are wrong – it’s still down to the photographer.
RAW files, due to their greater ability to record data, take up more space on a memory card/hard drive, so it’s worth bearing in mind if you only use small memory cards.
You will also need to have editing software that can read a RAW file to be able to edit. Photoshop, Lightroom, Luminar and Affinity Photo can all work with RAW files – and there’s more, so you won’t be stuck for choice.
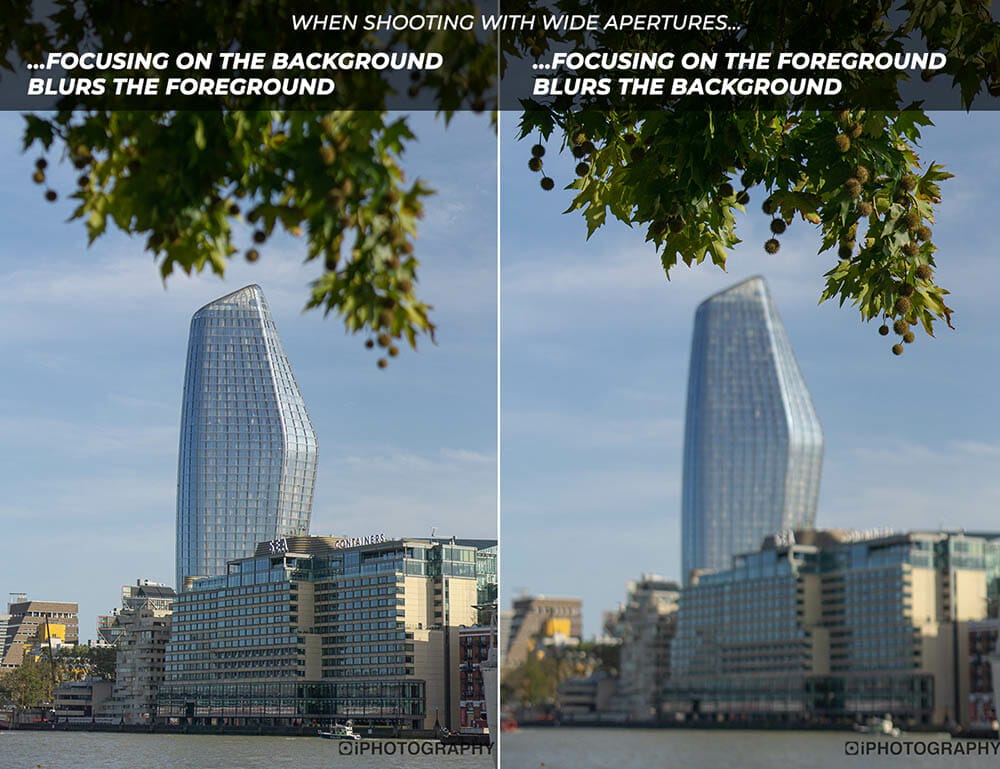
Depth of Field (DoF) is directly connected to aperture and F/stops. When studying photography for beginners it’s important to know the relationship between F/stops and Depth of Field. DoF simply refers to how much of your photo is in focus.
To increase how much of your photo is in focus you’ll need to use a smaller aperture i.e. F/16 and to make less in focus use a wider aperture i.e. F/2.
You can use DoF to isolate subjects in a scene, for example, a lone tree in a forest, or a single person standing in a group. Or you can use it to give a greater sense of detail and sharpness from the front of the image to the background as seen often in landscape photography.
You can shoot in manual mode or aperture priority to control DoF in your camera. DoF is not solely controlled by the F/stop – it’s also controlled by distance to the subject and background.
The rule of thumb is that the area of focus (however big it is) extends 33% in front of the focus point and 66% behind it. This means that something 10 ft behind the thing in focus is more likely to be in focus than an object 10ft in front of it.
Therefore, to get a more blurred background you can simply move the camera closer to your subject and now the focus point has come closer meaning the background is comparatively further away – pushing it further out of focus.
If you can’t move your camera closer, then bring your subject nearer to the camera instead.
Alternatively, if you want more of your background then compact the whole scene by bringing the camera, subject and background as close together as possible without changing your composition too much.
Beginner photographers sometimes struggle with getting their photos in focus. Given the technology and intuitiveness of digital cameras, it’s not as hard as it used to be.
On most digital cameras you’ll see a little red dot or square on the screen which beeps or turns green when focus is locked. Only after you get this notification should you take the shot.
Good photos are the ones with interest and detail, which generally comes with being in focus – but when you’re going abstract these rules go out of the window – but for the most part getting shots in focus is important.
Cameras will offer a few different methods of focusing. These are in-built camera systems that are designed for different types of subjects.
● AF-S / One-Shot / Single-Shot (autofocus single) – When you half-press the shutter button the camera focuses on what you’ve pointed at. You can then fully press down to take the shot.
● AF-C / AI Servo (autofocus continuous) – Designed for moving objects. This time instead of lifting your finger off the shutter button you can hold it down for long and take a burst of shots and the camera will continue to focus on any moving subjects in the frame.
● AF-A / AI Focus (autofocus automatic) – Basically, it begins as a single shot but your camera needs to lock in focus on a stationary subject first. But if your subject starts moving, the single-shot mode stops and the continuous method takes over to track your moving subject. It gives you the best of both worlds.
As long as you are placing your focus spot on the most important part of the image then you won’t go far wrong.
We’ve all taken photos that have come out a little too bright, what’s going on? How did that happen? Well, chances are you’ll need to change one of your camera settings and also take a look at your histogram.
The histogram of a camera (which won’t be available on every camera) is a graph detailing the colours in a photo. The width of the graph goes from black on the left to white on the right.
If your photo is very bright your histogram will probably look like this;
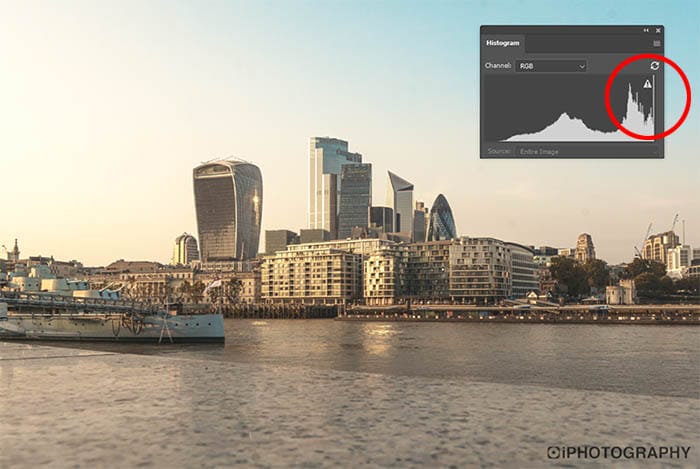
The graph has peaks towards the right meaning there are lots of bright tones in the shot. The height of these peaks relates to the volume of bright pixels.
Ideally, you want to avoid your histogram readout touching the right side of the chart – this is known as clipping the highlights. It means there’ll be areas so bright on your photo they contain no picture information. It’s like putting 5 coats of white paint over wallpaper and then trying to undo it – you’ll never get the wallpaper back, the information has been lost.
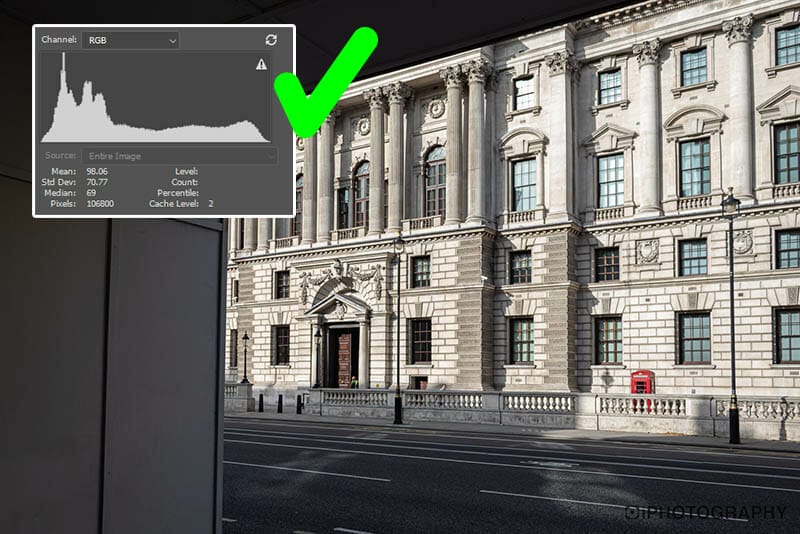
The exact same goes for the dark areas to the left of the histogram too. If the readout is bunched to the left side then chances are your photo is very dark.
This happens a lot in night time photography and can be remedied by using a wider aperture, slower shutter speed or a higher ISO setting.
Avoid from letting the histogram touch the left side of the graph (or clipping the shadows) for the same reason as before.
A good histogram should be one that avoids touching the edges. It doesn’t matter how tall the peaks in your histogram are just as long as your image has a nice spread across the tonal range.
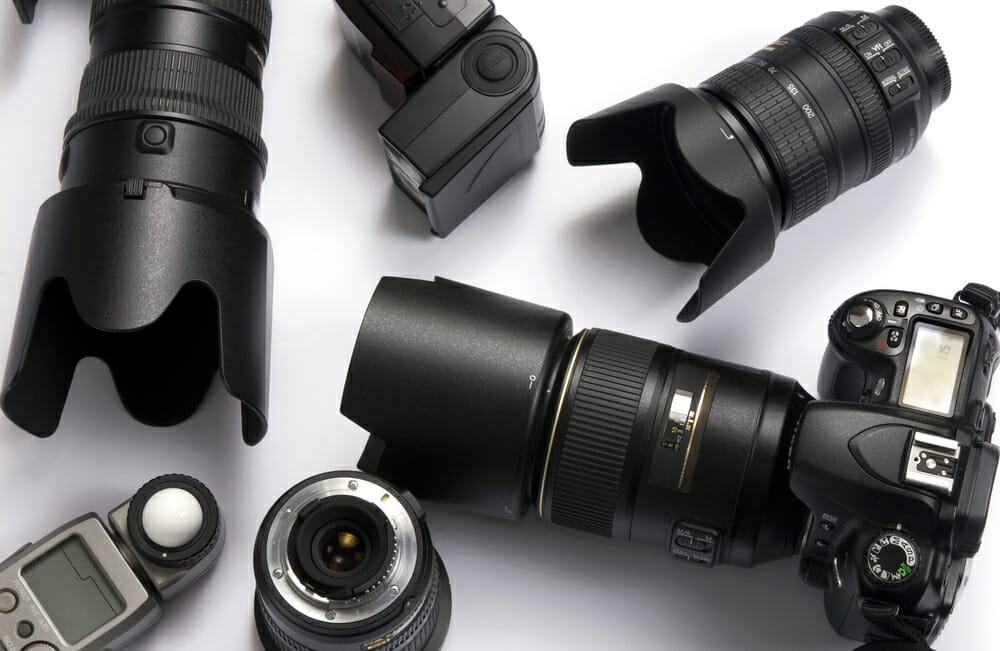
Much like the best camera you need is the one you’ve already got – same goes for lenses. The best lens for beginner photographers is the one you already own. Whether it’s the lens on your phone camera or the kit lens that came with your camera – it doesn’t matter at this early stage in your hobby.
Knowing how to use your lens and compose your photograph is much more important in photography for beginners than anything else.
When you are ready to step up your photography and want to concentrate on specific types of area that’s when you’ll need more advice on what to buy.
A standard 50mm prime lens (a lens that doesn’t zoom) is quite popular as it is a good everyday lens useful for a range of genres. The 50mm focal length does not distort objects in the way that very short and very long focal lengths can, which is why it is quite popular.
Here is a brief overview of other suitable types of focal lengths in lenses for other areas of photography;
● Landscape 18-135mm (max aperture around F/4)
● Macro Photography – 60mm or 100mm (1:1 magnification ratio)
● Astrophotography – 15mm – 30mm (F/1.4 – F/2)
● Portraiture – 50mm or 85mm (widest aperture of F/1.4)
● Wildlife – 200mm – 600mm (fast lens with image stabilisation)
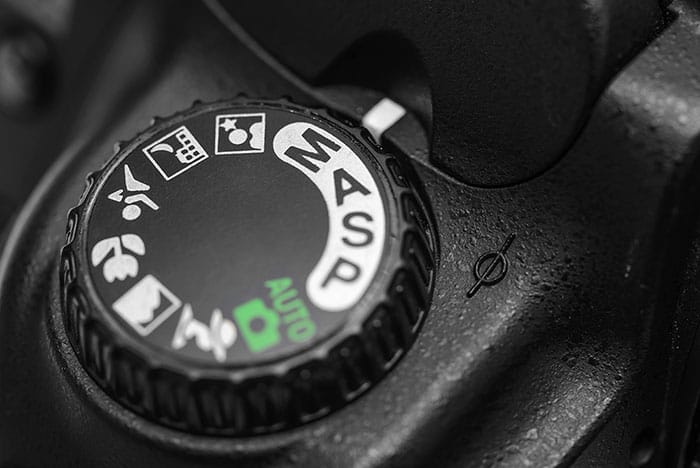
Photography tips for beginners wouldn’t be complete without a brief discussion of that camera dial you see on the top of most DSLR and Mirrorless cameras.
They are the heart of your camera’s shooting presets and offer a range of creative options depending upon how confident you are with your camera at this stage.
The most common modes that photographers use are;
● Aperture Priority (A/Av)
This allows you to take control of the aperture (F/Stops) and the camera will do its best to balance out the exposure by automatically changing the other settings. It allows you to concentrate on the Depth of Field and nothing else.
● Shutter Priority (S/Tv)
In the same way that aperture priority only lets you control the F/stops, shutter priority only lets you manually change the shutter speed. This is a good mode to practise on capturing fast moving subjects (wildlife, athletes, cars etc) and the camera will automate all the other settings.
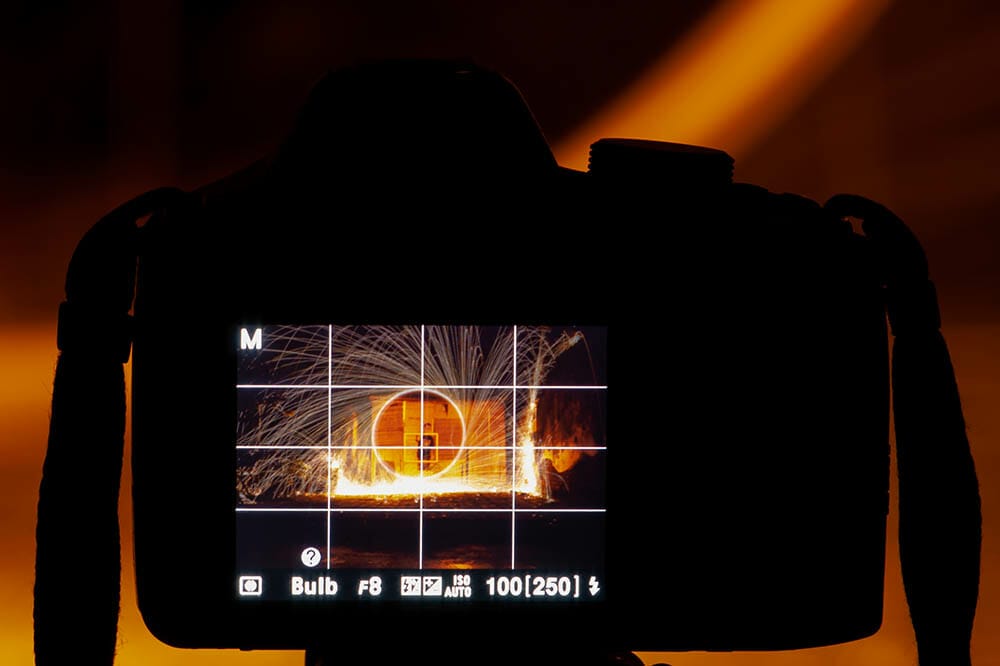
● Manual (M)
This is when you have full control over everything. The camera will not help you out in manual mode. Don’t swerve shooting in manual as it is the most creative mode on the camera dial and will only make you a better photographer over time. Expect to make mistakes with your settings, but only through mistakes will you improve.
● Program (P)
Some photographers refer to program mode on the camera dial as an ISO priority mode as that’s the one of the main settings that can be changed, along with exposure compensation. The camera will create the best exposure otherwise by altering the aperture and shutter speed.
Program mode is a little step up from AUTO but more automated than A/Av and S/Tv. Manual mode is the most control you can have over your camera.
Most DSLR and Mirrorless cameras these days will feature 1 of 3 different sized sensors. These sensor sizes have an effect on the size of image that is captured and also the quality of image (given that a larger sensor can capture more light).
The size of a camera sensor does have an effect on the actual focal length of your lens. This is what photographers call crop factor – and you can read more about crop factor here.
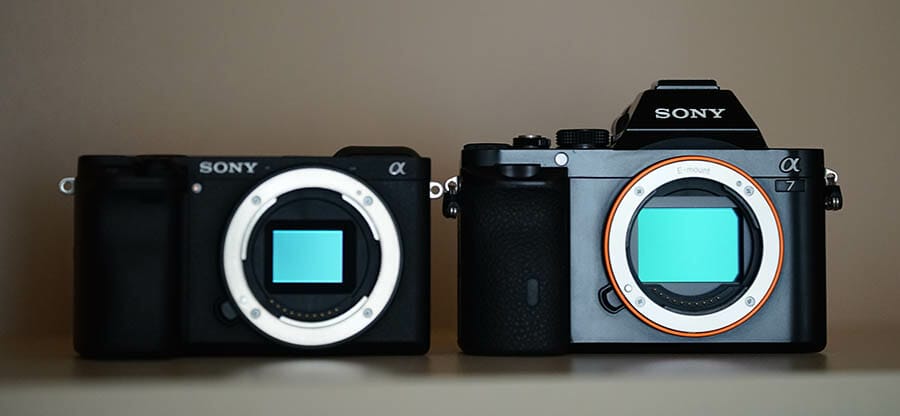
Full frame sensors are the same size as a single frame of 35mm film. That’s the standard digital cameras that are used to compare against sensor size.
Full frame sensors deliver exactly what you see through the camera. There is no crop factor applied to mean what you’d see if you look through the lens at 50mm you’d see the exact same on your camera screen.
This larger sensor size can pick up more light as the surface area is larger and therefore gives better results when shooting in low light. Most professional (but not all) photographers will use a full-frame camera.
Images taken on a full-frame camera are larger in file size and will be able to print bigger which is beneficial for commercial purposes. But if you are to be posting your photographs online all the time then a full frame camera may be unnecessary.
The most common sensor size currently is APS-C (Advanced Photo System – Classic). They are about 1.5-1.6x smaller than full frame which is where the crop factor comes from.
You need to take crop factor into consideration when using a cropped sensor camera. For example when using an APS-C camera with a 50mm lens the focal length is more like 75mm. This is because the crop factor of 1.5x has to be multiplied by 50mm to get the true focal length of what you’re seeing through the viewfinder.
If you wanted a true 50mm focal length using an APS-C camera you would need to use a 35mm lens instead to get close (35 x 1.5 = 52.5mm).
These cropped sensors are still very reliable and can result in great images that can print to a decent size.
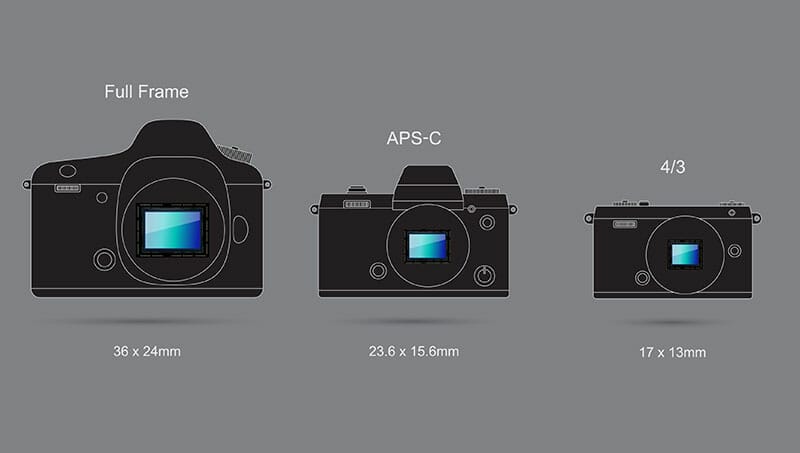
Much like APS-C sensors having a crop factor, Micro Four Third sensors (MFT) are smaller again in size. Therefore, their crop factor is 2x.
Panasonic makes a great range of MFT cameras that are compact in size but still deliver a great image.
Due to the reduced sensor size, their print size will be more limited than larger sensors and their ability to handle low light situations aren’t as good as APS-C / Full Frame sensors.
‘Pretty’ photos are subjective – as all photography is. But if you’re looking for an image with interesting content, a good story all put together in an aesthetically pleasing way you’ll need to learn about composition.
Composition is basically where everything is in the photo, how it relates everything else around it and where do our eyes (as a viewer) go to in the frame.
The most common compositional techniques you’ll hear about are Rule of Thirds and Leading Lines.
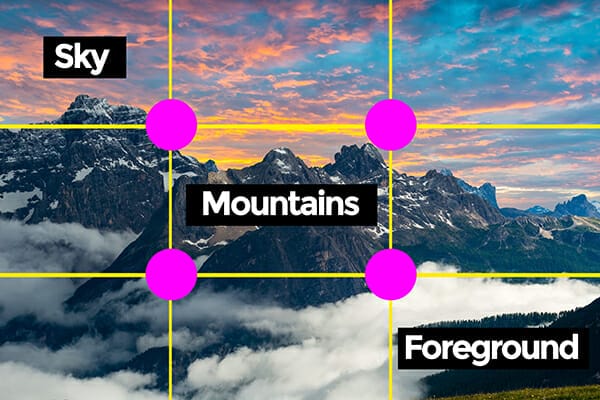
Imagine your photo being split up into 9 small rectangles on screen. This grid (which you can place a virtual one over your photo on the back of some digital cameras) helps you create balance and proportions.
For example, landscape photographers place the sky in the top third, the main subject in the middle and the foreground at the bottom.
The cross points where the lines intersect are called power points and these are great locators for where to position objects in the frame.
It’s nearly impossible to take a photo without being able to include a leading line in some respects. It’s a line that draws the attention of the viewer to a specific object, area or vanishing point in the photo.
These lines can be straight, diagonal or curved – like a spiral staircase. Lines can travel through a subject and beyond or be in the background pointing towards something.
The answer to this last question could go on for years! There are so many ways to edit a photo – it depends on the photo and what you want it to look like. It’s like asking ‘how do I paint?’.
Because of this, it’s best to direct you to iPhotography’s amazing photo editing courses. We’ve got loads based on different software – Photoshop, Lightroom, Affinity Photo, Luminar 4 and even a photo editing course designed for iPad users.
We’ll show you the power of all these softwares and apps and how they transform an image. In each course, they’ll be lessons on what each important tool does and how you can use it to improve your photos.
Editing photos has become part of the norm now in photography. Every beginner photographer should learn post-processing as it is an opportunity to enhance a great photo and prepare it for the world to see. It’s an important photography skill even though it doesn’t involve the camera.
Photography techniques are something that is built on and improved over time. No photographer will ever master the art and sit back and say ‘photography, yeah, completed it mate!’ – it doesn’t happen.
Through learning how to use your camera you can solve issues with white balance, blurry photos, darkness problems and more!
Join an iPhotography course and we’ll get you started in the right direction.
Learn all about banding, artefacts, pixelation, and moire as a photographer to help you capture and edit with the best image quality.
Learn the art of capturing stunning cityscapes with these beginner-friendly tips and techniques. Master the urban jungle through your lens!
Get a breakdown of each factor of exporting to give you the best export settings for photographers using Adobe Lightroom for photographers.
© iPhotography™